Tag Archives: food blogger

8 Tips and tricks probably you didn’t know before!


tips and tricks

Here are some tips and tricks worth knowing, it will help you and save your time. Some were totally new to me and wished i knew from before!

1- Testing egg freshness

PrintEggshells have pores that allows air to get in over time. The more air enters the egg the lighter it gets, which explains why it will float. So if it floats, get rid of it!

2- Don’t touch the cheese with your hands

don't touch the cheese with your handsDon’t touch the cheese with your hands while cutting, the bacteria from your fingers promotes mold faster. Either wear gloves or keep your hands over the plastic wrap of the cheese.

3- Store the salsa jars upside down

salsa jars upside downStore the salsa jars upside down in the fridge, this way it prevents mold from sprouting up.

4- Separate the bananas at the stems to prevent quick ripening

seperate bananas
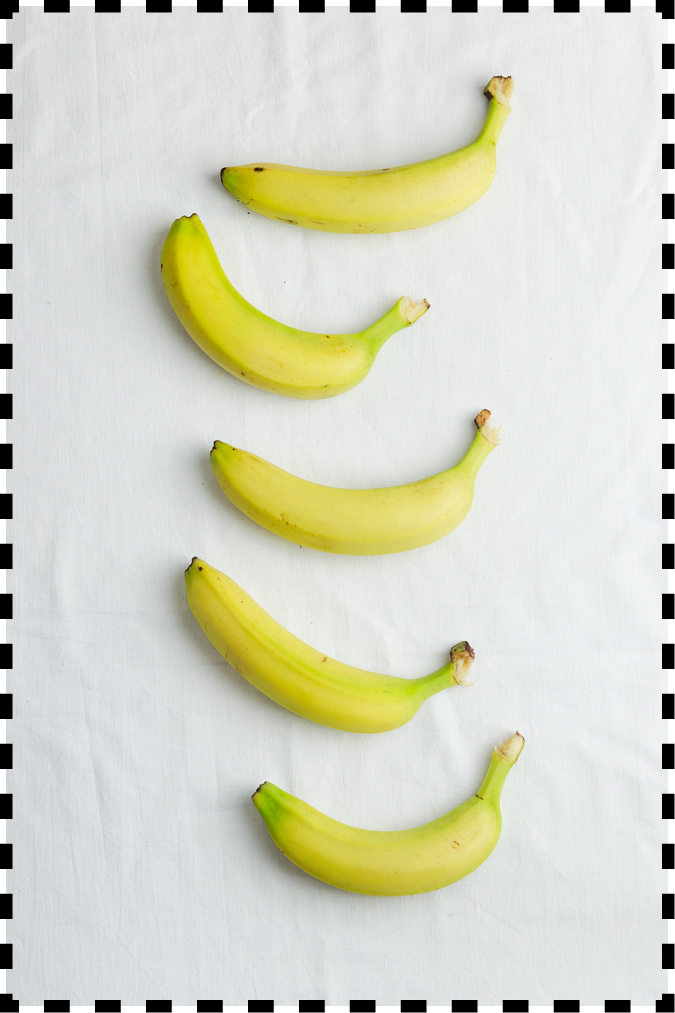
If you want your bananas to last longer, separate them at the stem. The reason bananas ripen more quickly when they’re not separated is because they emit ethylene gas. A bunch of bananas together lasts 5-7 days but when you break them apart they can last up to 14-17 days!

5- Place a wooden spoon to keep water from boiling over pots

use wooden spoon for boiling water
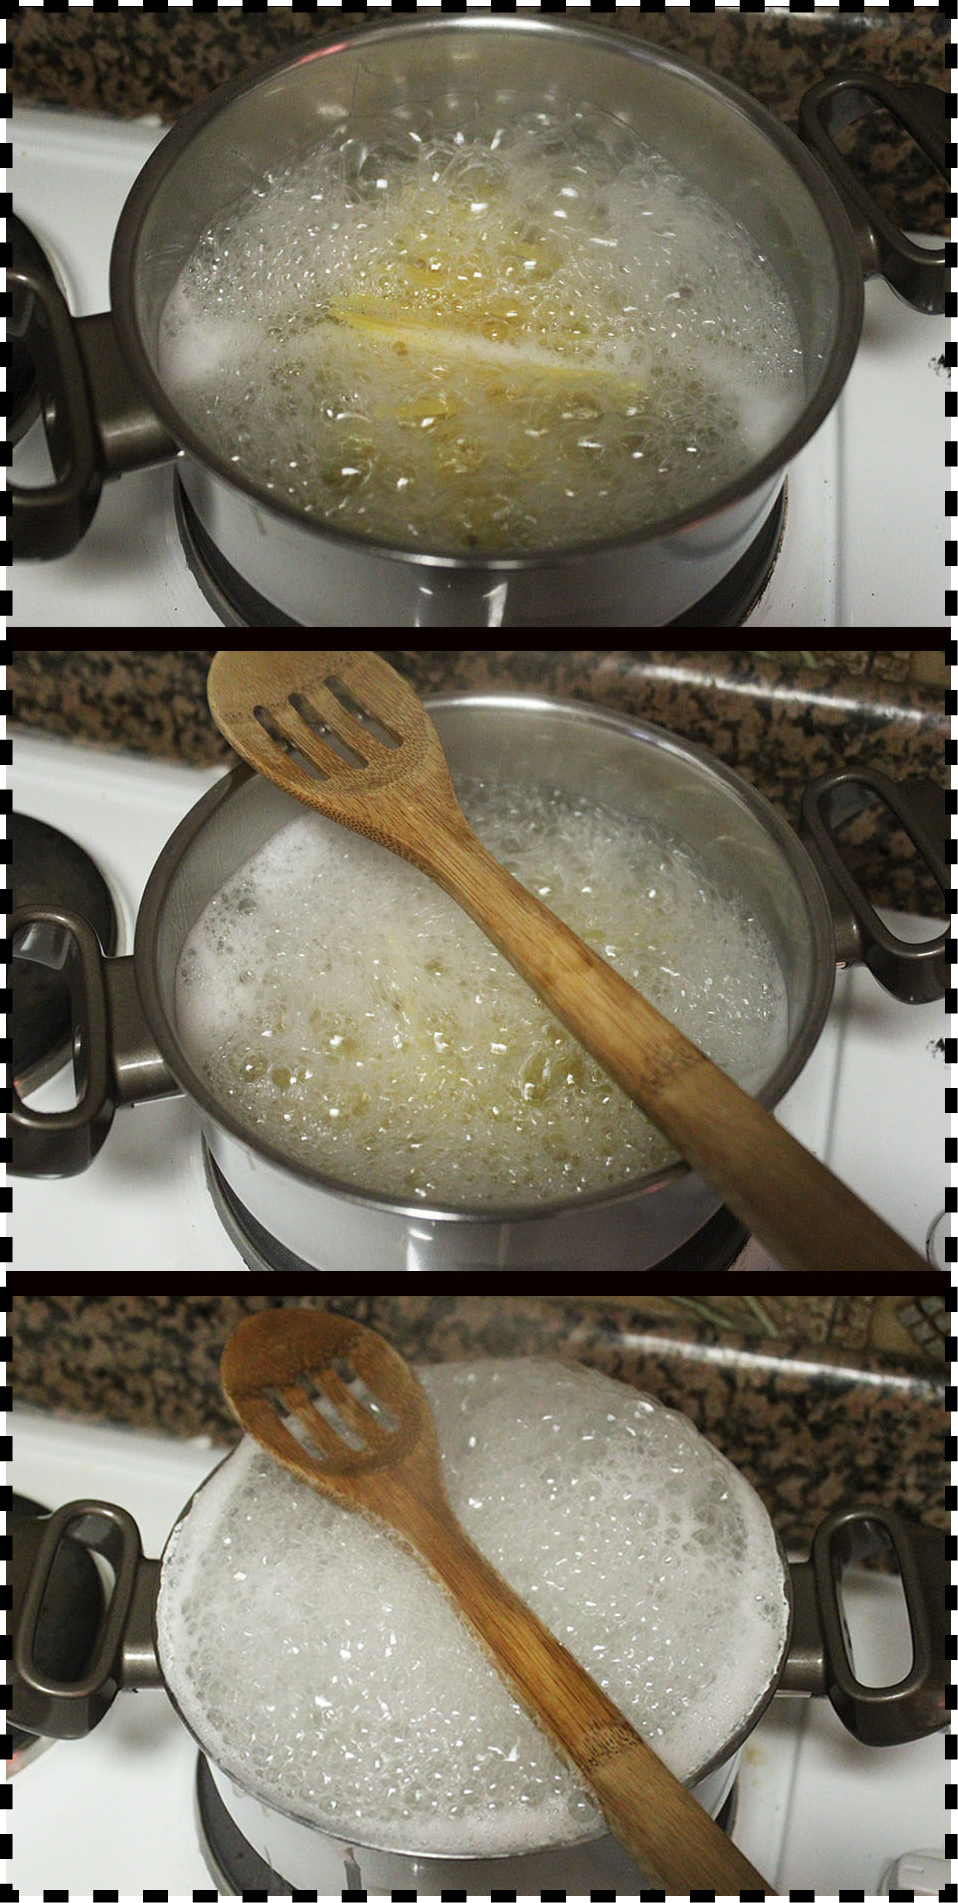
A wooden spoon pops the bubbles when they are in contact, plus it can absorb some of the moisture, so water stays down and don’t boil over. Metal spoons don’t have same effect!

6- Roll the lemon before squeezing

roll the lemonRoll the lemon or any citrus fruit applying a bit of pressure before juicing. This way you burst the tiny cells in the lemon flesh to give more juice!

7- Pepper bumps

peppersPeppers with 3 bumps on the bottom are sweeter and better for eating while peppers with 4 bumps on the bottom are firmer and better for cooking.

8- Rub your hands with stainless steel to remove the odor

stainless-steel-for-onion-smell-on-handsAfter working with garlic, onion or fish, rub your hands vigorously on your stainless steel sink for 30 seconds before washing them. If your sink is not made of stainless steel, simply rub a stainless steel spoon, It will remove the odor. Now you can buy a soap like piece of stainless steel from some supermarkets.

If you like this post give it some likes and shares to spread the joy. Don’t forget to like marmite et ponpon facebook page and follow on twitter. More interesting posts are yet to come.

Easy pan grilled chicken with mushroom sauce


IMG_4942It’s one of those delicious meals for busy moms or even bachelors who wants their food to be served in less than 30 mns. Incredibly flexible dish, can be served with grilled or sauteed vegetables, with mashed potatoes or even pasta.

To create the easiest and quickest mushroom gravy you need:

  • 4 cups of water
  • one sachet of mushroom soup (50g)
  • 2 cubes chicken stock (20g)
  • 3 tbsp flour
  • 1 cup sliced mushroom
  • 1 tbsp whiskey

Choose your favorite brand of mushroom soup and prepare the creamiest and most tasty gravy for your quick meal. Combine water, mushroom soup, chicken stock and flour in a casserole, mix well and bring to boil. Keep whisking all the time to get the consistency you need, about 3-4 minutes.

Add the mushroom slices and boil for two more minutes. Take off the heat and add the whiskey. It will give it the twist you will enjoy. Eh voila the gravy is ready.

IMG_4935Season around 800g of chicken breast with salt and pepper and pan grill. Do not flip the chicken many times, they will become dry and chewy. Keep each side around 4-5 minutes for tender and juicy result. This quantity will serve 4 people.

Serve it along with what you fancy to eat, personally i like mashed potatoes and sautéed vegetables in salt and butter.

IMG_4943You will probably make it a regular in your home but what I promise for sure you will lick your plate clean, not a single drop will be left at all. Enjoy!

IMG_4938IMG_4931If you like this post give it some likes and shares to spread the love. Don’t forget to like marmite et ponpon facebook page and follow on twitter. More delicious posts are yet to come.

Sweet balsamic glazed salmon


IMG_4922I guarantee you it’s the only way you will ever make your salmon from now on. The sweet and tangy flavors blend together to give you this flavorful salmon.

Beside of having a quick meal, ready on your table within 20 mns, you will be enjoying a sustaining dish full of nutrients, such as the amazing omega-3, vitamin B3, B6 and B12, protein and vitamin D.

Bottom line, eating salmon makes you smarter and happier!

IMG_4898To make the glaze you will need:

  • 1/2 cup balsamic vinegar
  • 1 tbsp honey
  • 1 tbsp brown sugar
  • 2 tbsp Dijon mustard
  • salt to taste

Mix all ingredients and bring to boil for 5 minutes to thicken.

Place 4 pieces of salmon (each 200g) skin-side down on the prepared baking sheet. Cooking in baking papers keeps the fish deliciously moist as it bakes in its own juices, minimal cleanup needed later and it’s definitely more healthy than aluminium foil.

Brush with the glaze, bake for 10 minutes in the oven on 200°C, brush again with the glaze then bake uncovered for 5 additional minutes, until the fish flakes easily with a fork and is cooked through.

IMG_4917

Transfer to your plate, you will see the skin will remain easily on the baking paper, add the remaining glaze and sprinkle with sesame seeds. Serve with potatoes, rice or pasta. This quantity serves 4 people.

IMG_4902This tender, flaky and flavorful salmon will leave you basking in compliments from your loved ones!

IMG_4906If you like this post give it some likes and shares to spread the joy. Don’t forget to like marmite et ponpon facebook page and follow on twitter. More posts yet to come.

Creative Easter eggs decoration -Dinosaurs land- DIY


IMG_4896As i always say, my son is my source of inspiration. He is so much into dinosaurs lately, so a NADYnosaurs land is the perfect idea for this year’s Easter eggs.

As promised in previous post and If you’re willing to recreate this dino park, follow me step by step in this tutorial, it’s much easier than you think.

IMG_4801To make the dinosaurs eggs, you need first to dye the hard boiled eggs with a color of your choice. To marblize the dyed eggs (to give the effect of real dino ones), add a tbsp of olive oil to another color, preferably darker, then dip them in and let sit about 2 minutes before you pat dry.

I always recommend wilton coloring gel for healthy results.  Add vinegar to your colors for vibrant effect.

IMG_4842We tried as well with brownish colors to make it as real as possible!

IMG_4843For the Dinosaurs, click here to download a high resolution file of the tail, back and head to stick on the eggs.

IMG_4845For the Nadynosaur banner, click here to download the file, you can easily change the name on it.

IMG_4852 IMG_4855 IMG_4858 IMG_4859

The biggest the park you want, the more eggs you should decorate. The files i attached present 3 color options of the dinosaurs; blue, green and orange. You can change easily to your favorite ones (vector files). Enjoy the best moments with your kids. Nothing better than seeing their happy faces! Just priceless!

IMG_4884 IMG_4885 IMG_4886

Happy Easter everyone. المسيح قام، حقاً قام

IMG_4892 IMG_4895

If you like this post give it some likes and shares to spread the joy. Don’t forget to like marmite et ponpon facebook page and follow on twitter. More interesting posts are yet to come.

Peach rose tartlets celebrating spring


IMG_4649A beautiful and elegant tart, ideal to welcome the spring season and embellish your Easter tabel. Very refreshing and fall in the wow category of desserts, and what makes them even better they are very easy to do.

IMG_4657

For these bright tarts you need to prepare Crème pâtissière (pastry cream). Check the link of the recipe posted earlier.

To make the crust you need: (yields 12 small-medium tarts)

  • 100g butter
  • 1 1/2 cup flower
  • 1 egg
  • 1/2 cup sugar
  • 1 tsp vanilla

Combine all together and knead until the dough is smooth. Let it rest couple of hours or better overnight before rolling it in small tart molds.

Bake for 6-8 minutes on 180°C, Keep on checking, when the edges start to turn to golden, it’s time to remove, you don’t want them to get brown.

IMG_4645Remove form oven and let it cool. Take out the pastry cream already prepared and stored in the fridge, spread a rich layer of the cream before adding the peach slices.

IMG_4647If you are hosting a lunch or even afternoon tea, prepare them an hour ahead and keep them in the fridge. The best served cold, soooo refreshing!

If you are not fan of peach, you could substitute the peach with strawberry or pineapple and still deliver the same WOWness!

IMG_4663As festive as flavorful, these tarts are to be considered on your to do list for this season. You would love to close your eyes when eating to involve all your senses.

IMG_4667

IMG_4659If you like this post give it some likes and shares to spread the joy. Don’t forget to like marmite et ponpon facebook page and follow on twitter. More posts yet to come, stay tuned!