Christmas keepsake ornaments – homemade recipe


Christmas keepsake ornamentsKids will love doing this, seeing their handprint and footprint turning into Santa and Rudolph.

Last year we handmade our christmas tree decoration using a homemade salt dough, and it was absolutely fun. This year i learned another recipe of dough made with baking soda and cornstarch. It’s much better than the salt dough and it’s really white that makes it easier to color.

You will need:

  • 1 cup cornstarch (cornflour)
  • 2 cups baking soda
  • 1 1/2 cup water

Mix all ingredients in a saucepan and bring to medium heat. Whisk continually  until it starts to thicken. It will take couple of minutes to look like mashed potato in consistency, remove it immediately from the heat. Place it in a bowl and cover it with damp cloth until it’s cool.

Knead it on a smooth surface, adding cornstarch if it feels a bit sticky and let the fun begin!

christmas keepsake ornaments
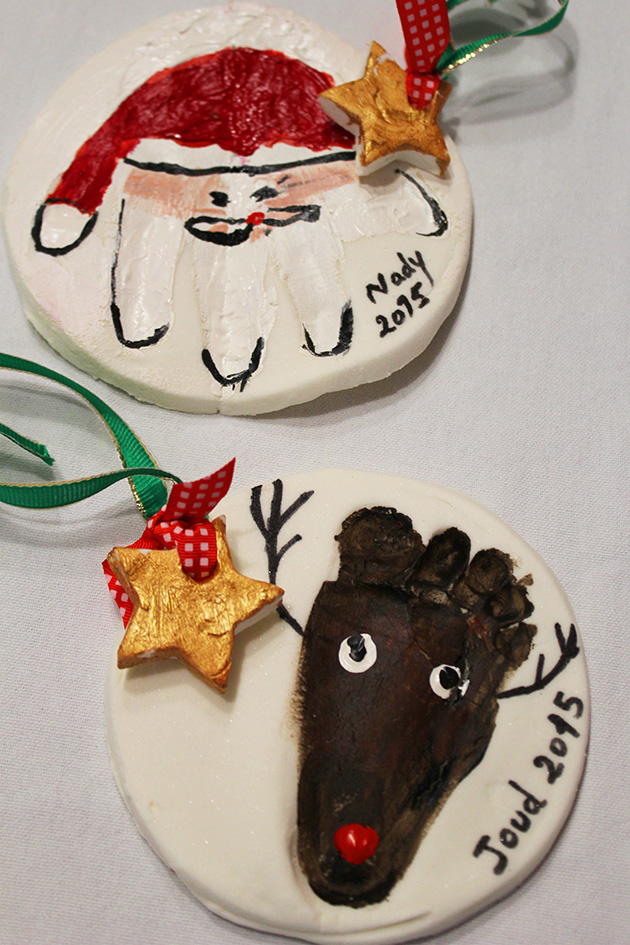
Cut two big circles and print your kid’s hand or foot. Make a hole with a straw to add a ribbon later to hang it on the Christmas tree. Transfer the shapes on a baking sheet and put them for an hour in a 70°C preheated oven.

Take them out, make sure they are completely cool before your kids start coloring them.

christmas keepsake ornaments
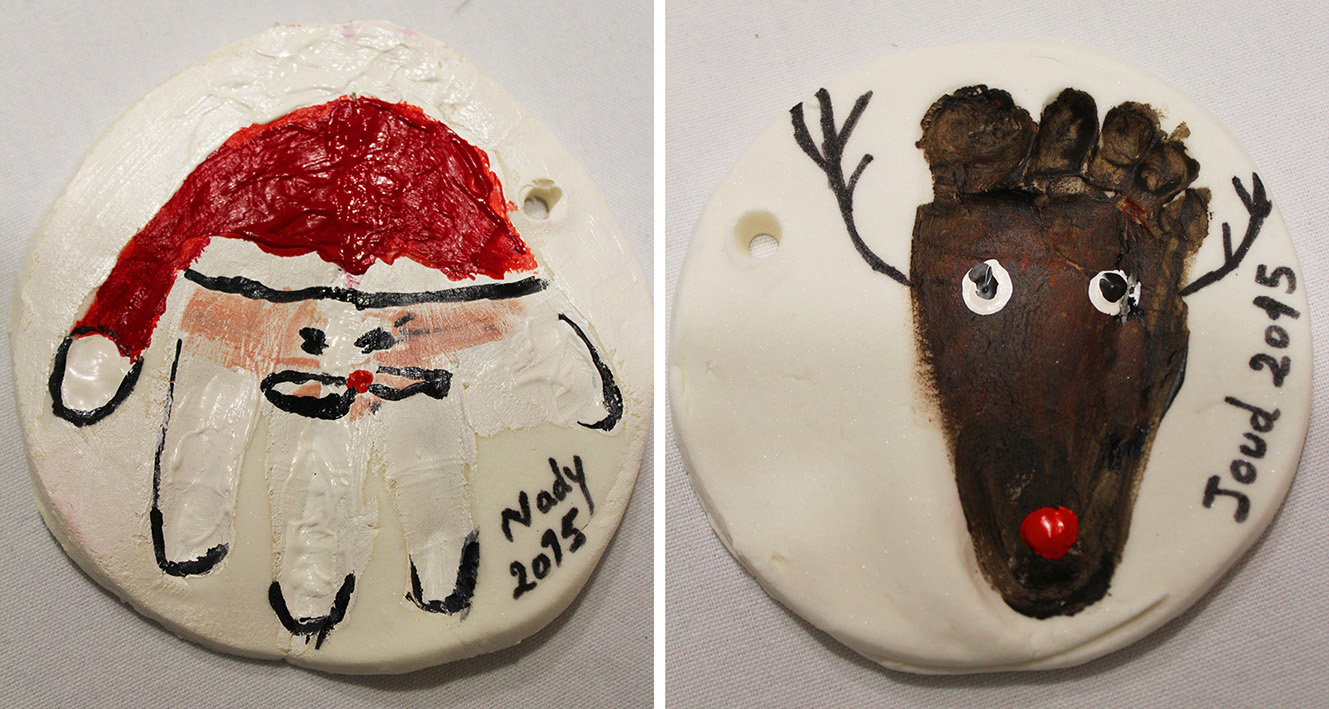
We turned Nady’s handprint into Santa and Joud’s footprint into Rudolph. Don’t forget to add the name and date, it will be a precious and memorable keepsake over years.

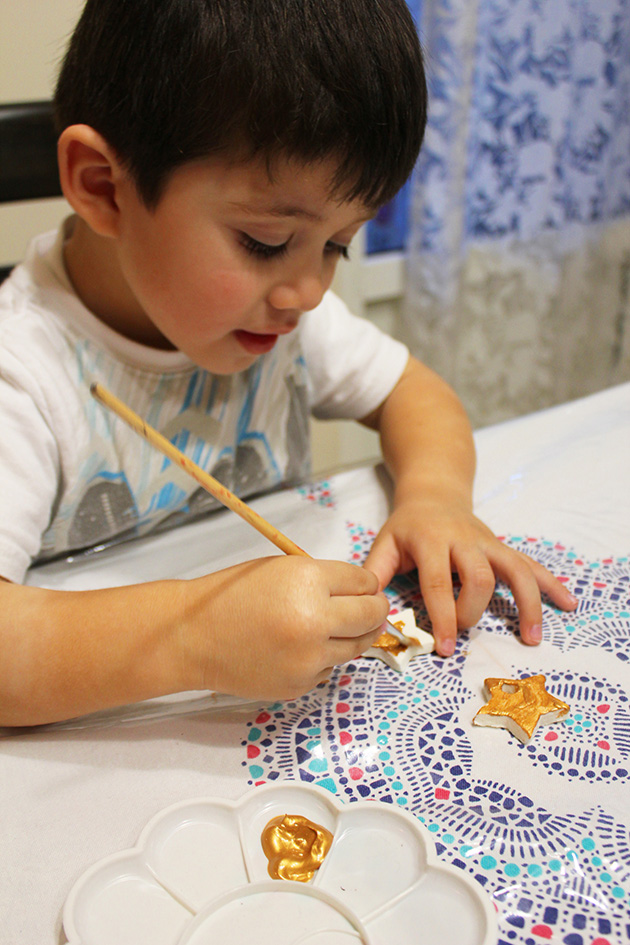
Nady colored 2 golden stars to add them to the ornaments before inserting the ribbons.

christmas keepsake ornamentschristmas keepsake ornaments

I am sure everyone who enters your house will be wowed by these beautiful ornaments. They will make your tree one of a kind.

christmas keepsake ornamentsWhat a beautiful season, i am overwhelmed with all these preparations. Every year, I wait impatiently for Christmas, it fills my house with joy, hope and kids laughter. Life is not worth enjoying without newborn Jesus in your heart and your kids in your arms. Happy holidays to all, Ho Ho Ho!

christmas keepsake ornamentsIf you like this post give it some likes and shares to spread the joy. Don’t forget to like marmite et ponpon facebook page and follow on twitter. More interesting posts are yet to come.

Adding fun to the traditional seeds planting on St. Barbara


Lebanese traditions say; people plant wheat on St Barbara day as an act of sympathy with St Barbara who was hidden in a wheat field while running away from her father. Nowadays we don’t just plant wheat, we do lentils, chickpeas or whatever grain that grows nicely taking advantage of it to decorate later the Nativity.

planting seeds on st barbara day

With kids everything we do should be fun and attractive or they loose interest. To make this tradition more entertaining, i added to the cups where we planted the lentils, pictures for Nady and Joud’s face. Cut it on top exactly at the beginning of the hair to make the lentils stems look like hair.

planting seeds for st barbara

And it was a good lesson on how we plant grains in cotton. Follow the images tutorial to see how we did it.

how to plant

You will need cups, use the shortest possible so you won’t need to fill in with a lot of cotton. Make some holes in the cup to let extra water come out. Soak well the cottons in water before sprinkling the seeds. Don’t put them under the sunlight directly, in a shaded place where they are exposed indirectly to light.

I couldn’t find wheat to plant it so i only used lentils. But if you find wheat they will look much closer to hair.

planting seeds on st barbara day


Let your kids water them daily and watch them growing. They will love seeing green hair on their heads! planting seeds on st barbara day

panting seeds for st barbara dayIt’s a great lesson of patience as well. They will have to wait at least 10 days before having long hair 🙂

planting seeds for st barbaraplanting seeds for st barbara

For those who were expecting some traditional sweets recipe, click on last year post for maakroun, and bon appetit!

If you like this post give it some likes and shares to spread the joy. Don’t forget to like marmite et ponpon facebook page and follow on twitter. More interesting posts are yet to come.

Santa napkin – DIY


santa napkin - DIYThis is the first time i am hosting my family for Christmas dinner after 4 years of marriage; we were alternating between my parents house and my in laws. I am beaming with excitement, it’s also Joud’s first Christmas. I want everything to be up to this special holiday, this year should be memorable.

Beside crafting some of the decorations with my son, my little artist, dressing the table for the traditional réveillon, is as important. A simple yet enticing Santa napkin will add a festive mood to the dinner.

santa napkin - DIYIt’s so simple and easy that your little ones can be involved in the making. All you need is red napkins, white pompoms and click here to download a printable file for Santa’s face that you need to cut out.

Here is a sneak pic to how my table will look like on Christmas Eve.

santa napkin - DIYFollow this step by step tutorial to see how to make this cute Santa, it will take less than 5 minutes:

how to do santa napkinPlace one on each plate, wow your guests and let your table radiate with joy!

santa napkin - DIY

You can check here previous posts form Marmite et ponpon on napkin folding and napkin rings for Christmas:

It’s never early to start celebrating. Happy holidays to all. Ho Ho Ho!

santa napkin - DIY

If you like this post give it some likes and shares to spread the joy. Don’t forget to like marmite et ponpon facebook page and follow on twitter. More interesting posts are yet to come.

Christmas tree advent calendar – DIY


christmas tree advent calendar

Here comes Christmas! The most beautiful and meaningful annual festival when happiness is a small word to what I actually feel. This Christmas comes with double joy, my family doubled in size; Nady and Joud my Christmas star.

It’s not early to set up the festive mood especially when it comes to Christmas decoration. Advent calendar should be ready by 1st of December, so if you are willing to DIY as we did, better for you to go ahead.

Last year we had a reindeer advent calendar, this year we created a beautiful cute forest of Christmas trees to start the countdown to the big day. A fun and simple craft to lay the foundation of a very exciting season. What’s better than the Christmas day is the anticipation to it.

christmas tree advent calendar

First you need to prepare 24 green cones, made with 200gsm cartons. You can use different shades of green to give it a realistic look.

christmas tree advent calendar

After all is done, i gave them to Nady to unleash his creativity. Give your kids their favorites materials and watch them being creative; pompoms, paint, washi tape, stickers….

christmas tree advent calendarchristmas tree advent calendarFor display, lay them on a white surface or use cotton to create snow. The sky is the limit, use any material for the mood you want to settle.

christmas tree advent calendar

Now the fun part of this advent calendar is what lays underneath 🙂 Oh yes, sweets and toys. Who doesn’t love a daily surprise gift while counting down?!

If your kid’s age let you take the advent calendar to the next level, don’t just hide sweets or toys under the cones, put words like love, hope, faith….to teach them the real meaning of Christmas.

christmas tree advent calendarIf you like this post give it some likes and shares to spread the joy. Don’t forget to like marmite et ponpon facebook page and follow on twitter. More interesting posts are yet to come.

Fingerprint art project – Surpriiiiise!!


fingerprint art project

Nady loves the crafty projects especially the ones that involves art and colors. This fun activity takes art to another level. We created an abstract art piece that reveals a surprise at the end.

I started by taping off Nady’s first initial onto a piece of paper. I gave him a palette full of paint and asked him to fill all the paper with fingerprints, dots created by his index to practice finger isolation.

fingerprint art project

Finger isolation is a fine motor activity using one finger to perform a task that will reveal its magic later in writing, tying the shoes, typing on a keyboard and many other skills….

We spent fun time covering all the white spaces on the paper experiencing various colors, mixing and learning difference between dark and light colors.

fingerprint art projectfingerprint art project

When he was done I pulled off the tape to show him what he had created. He was so happy and fascinated. Process of discovering many types of art medium and the surprise element is so magnetic for kids.

fingerprint art projectfingerprint art project

Not only was it a fun craft to make, but it was also a great way to teach:

  • finger isolation (fine motor)
  • finger’s name (using the index)
  • colors
  • shapes (round and dot)
  • the letter “N”, his name’s initial
  • And counting

Nady liked it so much, he decided that this piece of art is going to be added to his wall of art.

fingerprint art project

fingerprint art project

If you like this post give it some likes and shares to spread the joy. Don’t forget to like marmite et ponpon facebook page and follow on twitter. More interesting posts are yet to come.