Category Archives: design

Process art – Spinning for spring


spin art celebrating spring | marmite et ponponProcess art is when you’re enjoying the creative process, trying or inventing new techniques, introducing new elements from daily life, and the least you care about is working for the end result. In few words, process art is when the process of creating matters more than the result product.

Kids love process art, naturally they enjoy the journey more than the delivered product. They unleash their creativity, being all messy and mostly happy. Discovering and experiencing is the key! I was searching for a fun way of painting to start the spring/Easter decoration. I wanted Nady to be excited about the activity and enjoy the preparations. I came across the spin art paint.

spin art celebrating spring |marmite et ponpon

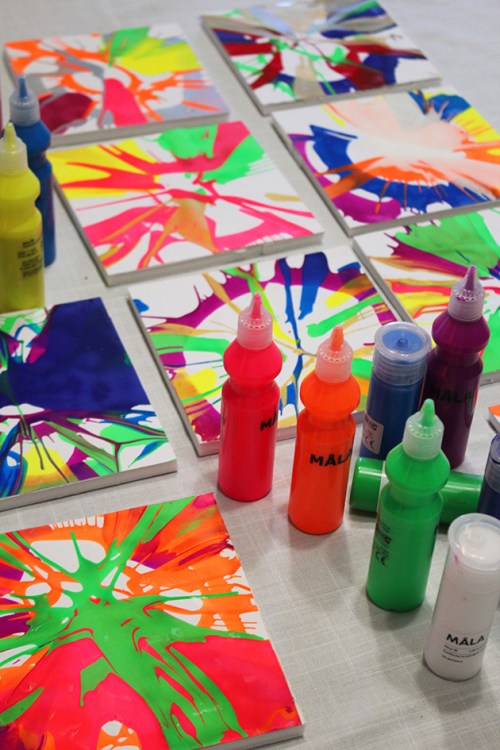
Without thinking twice i knew this is the type of activity that Nady will love. I got a

  • salad spinner
  • vibrant colors paint
  • card boards (cut in 18x18cm square)

… and here we go!

Put the paper inside the salad spinner, squirt some paint and spin!

We repeated many times with different colors combination and each time was more beautiful. In spin art paint we didn’t just enjoy the process but we were in love with the end product as well! Nady didn’t want to stop.

spring spin art |marmite et ponpon

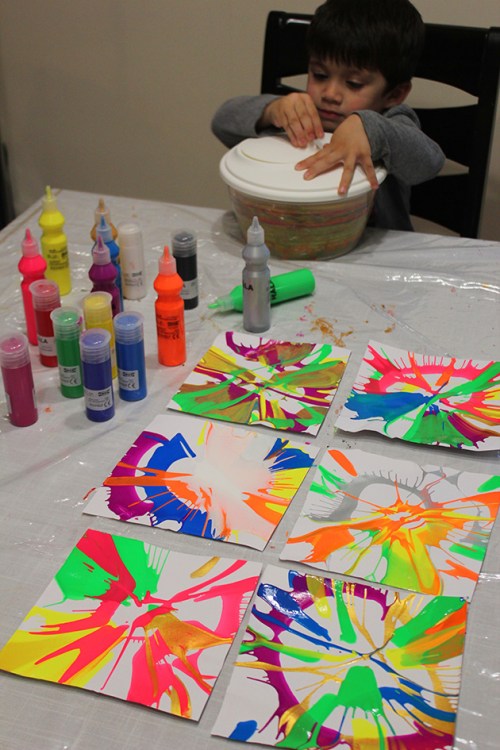
We kept them overnight to dry before mounting them on foam boards.

Nady was so happy he couldn’t wait to hang them on the wall. We both enjoyed this process art and the surprise effect with each time we open the salad spinner to discover a new painting. We decided to do all our decorations this way!

spring spin art|marmite et ponpon

The next day we repeated the same process with smaller pieces of paper to create a spring garland!

spin art garland |marmite et ponpon

spin art for spring |marmite et ponpon

That’s it for now but it’s not all. Wait for more posts of spin art process, we still have almost 3 weeks to Easter and a lot to do. Stay tuned!

spin art for spring|marmite et ponpon

If you like this post give it some likes and shares to spread the joy. Don’t forget to like marmite et ponpon facebook page and follow on twitter. More interesting posts are yet to come.

Endless ways i love you


endless love
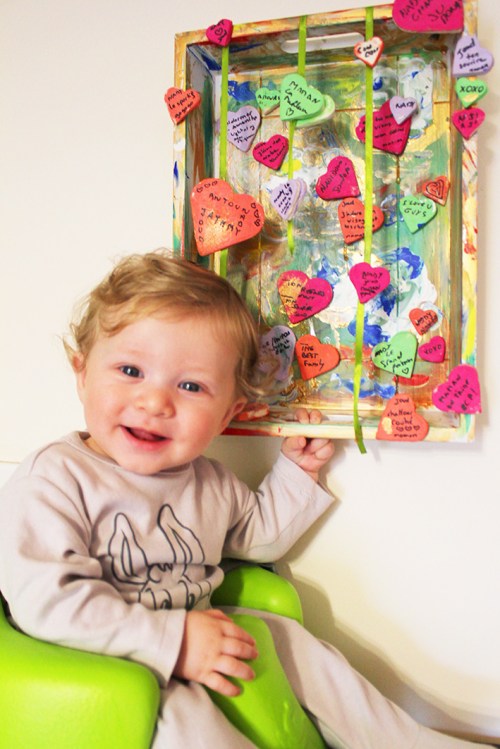
After the success of last year’s wheel of love i found an urge to revisit this activity, to express my endless reasons i love my family especially my family has grown since then.

As said before, telling your children “I love you” more often and expressing it for every occasion develops their secure attachment to you, knowing that they are loved unconditionally. Strong closeness to the family will lead no doubt to positive relationships in adulthood and high self esteem.

endless love 2
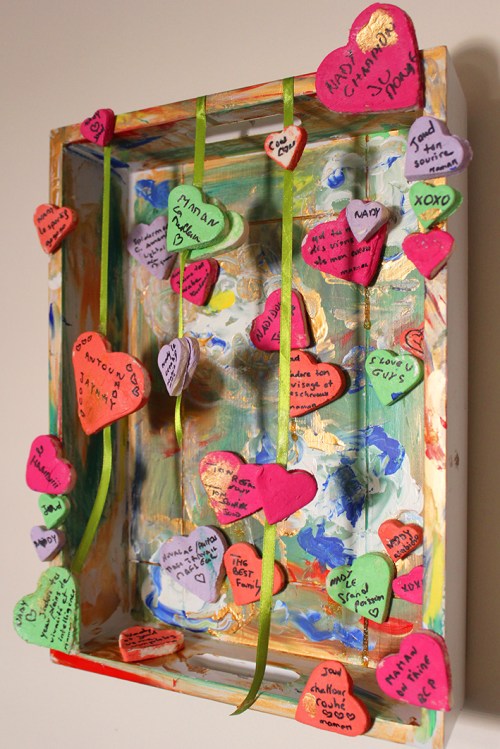
I still have faith in celebrating love if done in deep and expressive ways. Lot of you including me, find Valentines day becoming very shallow and commercial. Lets not go this path and teach our children the true meaning of love, the way of Valentinus the patron saint of lovers.

I used an old wood tray; i gave it some festive bright look by painting it with vivid colors.

endless love 3I prepared our homemade clay dough, and hand it to Nady to cut out heart shapes and color them.

A quick reminder on how to do the dough:

You will need:

  • 1 cup cornstarch (cornflour)
  • 2 cups baking soda
  • 1 1/2 cup water

Mix all ingredients in a saucepan and bring to medium heat. Whisk continually  until it starts to thicken. It will take couple of minutes to look like mashed potato in consistency, remove it immediately from the heat. Place it in a bowl and cover it with damp cloth until it’s cool. Knead it on a smooth surface by adding cornstarch if it feels a bit sticky.  And it’s ready!

Stick the hearts on the tray:

endless love 4
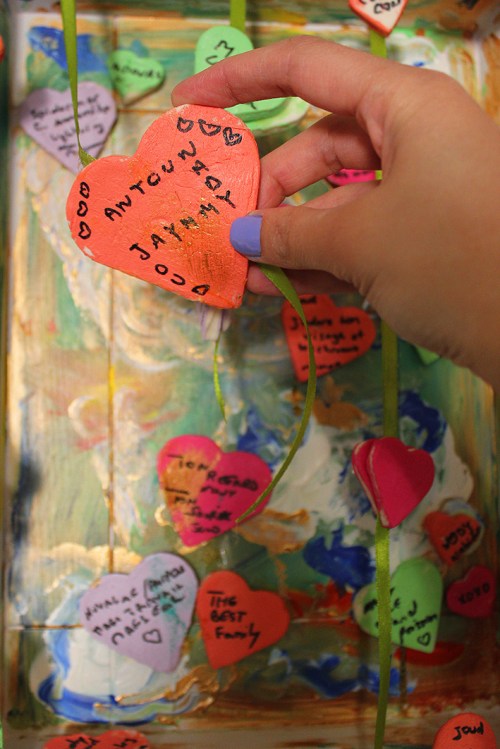
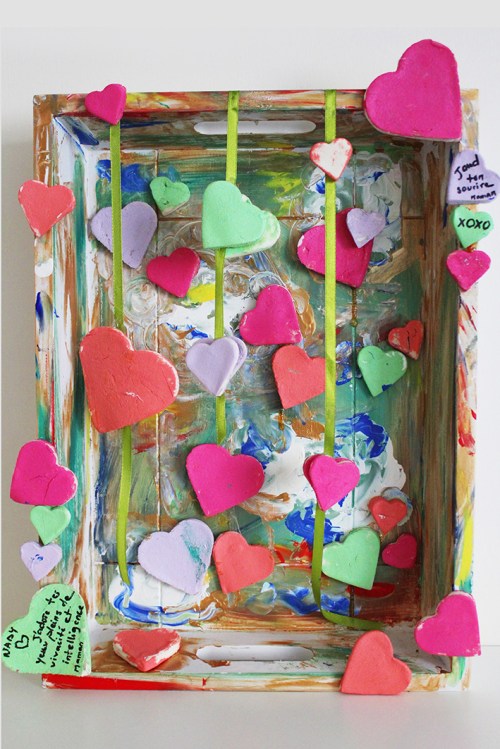
Enjoy writing on the hearts the many and endless reasons why you love your children and husband/wife too 😉 It’s not just for kids! Do it to your significant other and let love flourishes in your hearts and homes!

endless love 5Hang it on the wall as a frame, and if your children are old enough to write, you can get them involved in the game and stretch it for a longer time. Ask them to write the reasons they love you too and play this mutual love game starting a week ahead, hanging everyday one heart from each, until valentines day when you have filled all the hearts.

endless love 6

My boys are still too small to be able to read, Antoun and I filled all the hearts and read  them to Nady. Joud (6months) was enjoying the colors and kisses!

endless love 10

I wasn’t surprised with my Nady who visually memorized them and was telling me each heart is saying what! This is a reason why i love my smart boy.

endless love 7

Don’t forget that love is not only words, it should be followed by actions, and the most important the presence. Be present for your kids, in love, protection and service. Happy love xxx

endless love 8endless love 11

endless love 9If you like this post give it some likes and shares to spread the joy. Don’t forget to like marmite et ponpon facebook page and follow on twitter. More interesting posts are yet to come.


Superhero cake tutorial – Happy birthday Nady!


super hero cake tutorialMy little hero, a huge fan of superheroes (i guess like all boys of his age) turned three couple of days ago. He definitely fancy a superhero cake, but since he was hesitant which character to choose, i decided to surprise him and merge 4 in 1 cake; spiderman, captain america, batman, and hulk.

I am an amateur baker and self tutor, learning how to work with fondant and dress up a cake like professionals. I put all my heart to decorate this cake to be up to my son’s expectations. I would love one day when he looks back at his old pictures to be proud of this mom. So far i succeeded to do it over three years for his 3 consecutive birthdays. I wish him million cakes of happiness and good health!

super hero cake tutorial

This superhero cake looks complicated to do but if you follow me step by step you will find it’s not that hard.

  • First you need to cover the cake with 4 colors of fondant in equal parts; green for hulk, yellow for batman, white for captain america and red for spiderman.
  • To start with spiderman, you need to draw the web with chocolate or icing. Start by vertical lines then do the horizontal ones, each one like a semi circle.
  • super hero cake tutorial
  • For the eyes all you need to do is trace them on the fondant and cut out. Click here for a high resolution file for the eyes. It’s a vector one you can adjust the size according to your cake.
  • super hero cake tutorial
  • Captain america is super easy, to do his shield, start with a red circle, than a smaller one white, then a smaller one red and a final smaller one blue. Put on top a white star and decorate around the shield with blue small stars.
  • super hero cake tutorial
  • Batman is the easiest i guess. All you need is tracing the logo on black fondant and cut it out. Click here to download a high resolution file to use it as a stencil. It’s a vector file to be able to adjust to the convenient size of your cake.
  • Finally hulk, the part that needs the most work. First cut small irregular shapes to look like a wall when put together.
  • super hero cake tutorial
  • To do the hand, you need to make 4 green cylinders (fingers) and put them on a rectangular shape. Here you need to look at your real fist to try modeling the fondant the nearest possible to real one.
  • super hero cake tutorialtry when bending the cylinder shapes to do fingers, create the knots, nails and do small lines to look like flesh, these details will make it look real. If you don’t have the real tools for modeling you can use a knife.

Et voila the homemade superhero cake! Always add your personal touch, it adds more love and gives the occasion the warmth needed. happy birthday super Nady!

super hero cake tutorialIf you like this post give it some likes and shares to spread the joy. Don’t forget to like marmite et ponpon facebook page and follow on twitter. More interesting posts are yet to come.

Back to school – Double chocolate chip cookies with origami paper pouch fold tutorial


double chocolate chip cookiesBack to school means summer is over. I still recall this period of time from my childhood; full of excitement and concern. But this time is different, it’s my precious boy’s first year at school. Yes, my baby love is all grown up now… I have mixed feelings; i am happy, proud and anxious.

Hopefully it will be a good new beginning to a promising future. I wish you all the luck habibi Nady.

Like all kids of his age, he is fond of chocolate. I said why not preparing together a nice chocolaty dessert for his first day at school; double chocolate chip cookies for double happiness!

double chocolate chip cookiesTo prepare these rich cookies you will need

  • ½ cup butter (100g almost), softened
  • ½ cup brown sugar
  • ½ cup white sugar
  • 1 tsp vanilla extract
  • 2 large eggs
  • 1 tsp baking soda
  • ½ tsp salt
  • ½ cup cocoa powder sifted
  • 2 cups flour
  • 1 1/2 cup chocolate chips

Preheat your oven to 180°C, and prepare your baking tray lined with parchment paper.

Cream the butter and sugar. Mix in the eggs and vanilla. Add the baking soda, salt, cocoa powder and flour. Mix well then dump in your chocolate chips. I am telling you it’s very simple to make it 🙂

Shape the cookies, place them on the tray and bake for 10 minutes. This quantity makes 12-14 big pieces. Let them cool before serving.

double chocolate chip cookies


These cookies have a fudgy texture, they melt in your mouth, leaving an after taste of heaven. When you shape them, make them a bit thick to enjoy the taste.

double chocolate chip cookiesdouble chocolate chip cookiesThese cookies are meant to be part of Nady’s lunchbox. So we need to wrap them in a nice way. I prepared a paper pouch for each cookie. You already know i am fan of origami.

double chocolate chip cookiesThese pouches are really easy to make. Easy like 2 minutes! trust me. Follow this step by step tutorial:

how to fold a pouch


  • 1- Cut a square paper (color and size of your choice)
  • 2- Fold it in half diagonally
  • 3- Fold one of the lower corners to the middle of the other side
  • 4- Fold the other lower corner to the middle of the opposite side
  • 5- Fold down one layer of your top corner to create your pouch
  • 6- Now it’s ready to fill in your cookie

This type of folding is called diaper fold pouch!

double chocolate chip cookiesYou can use it not just for cookies, you can fill it with corn flakes, sandwich, pop corn or anything of your choice. Maybe just a paper with a message 🙂

If you like this post give it some likes and shares to spread the joy. Don’t forget to like marmite et ponpon facebook page and follow on twitter. More interesting posts are yet to come.

Fortune cookies favors for newborn – DIY


IMG_5481

Make your fortune cookies say what you like or wish! A cute and memorable favor to welcome your little one.

Feel like the luckiest mom on earth with these really cute and easy fortune cookies. The best thing is there is No baking required!

fortune cookies

These non edible cookies are made with a colored salt dough. To prepare it you need;

  • 1 cup flour
  • 1/2 cup salt
  • 1 cup water
  • coloring gel of your choice

fortune cookies

Mix all ingredients and knead well. Roll the dough and cut out circles, this quantity yields 12-15 circles (depending on how big you want it).

Place your customized message in each circle before folding to half. Pinch the middle of the cookie with a knife to twist it.

fortune cookies

You can make many batches to get all the colors you want. Leave them to air dry before offering to people.

And here are my cookies full of wishes and good fortunes for my new little Joud.

fortune cookiesfortune cookiesIt was a great way to share with the family and friends our happiness and fortune to have our bundle of joy among us.

I am sure these favors will be memorable, as a surprise factor and non usual favor. Don’t hesitate to try it, write whatever you like to say and jazz up your happy event.

IMG_5603

IMG_5578IMG_5577IMG_5579

If you like this post give it some likes and shares to spread the joy. Don’t forget to like marmite et ponpon facebook page and follow on twitter. More interesting posts are yet to come.