Tag Archives: DIY

clothespin airplanes – kids crafts


clothpins airplanes

We travel a lot, therefor airplanes became familiar to my son who is very enthusiastic for. Today we decided to travel somewhere in our imagination using clothespin, popsicles sticks and pompoms.

clothespin airplanes

Simple and easy activity (doesn’t need too much preparation) to strengthen his motor skills, enrich his vocabulary and widen his imagination.

We were bored at home, and i wanted to create a last minute simple activity to make him busy. But i didn’t want the fun to end fast. So we started by sorting the colors by naming them and the objects we are using before we create the planes. Very simple way to teach your kid the colors and adding new words to his vocab.

clothespin airplanes

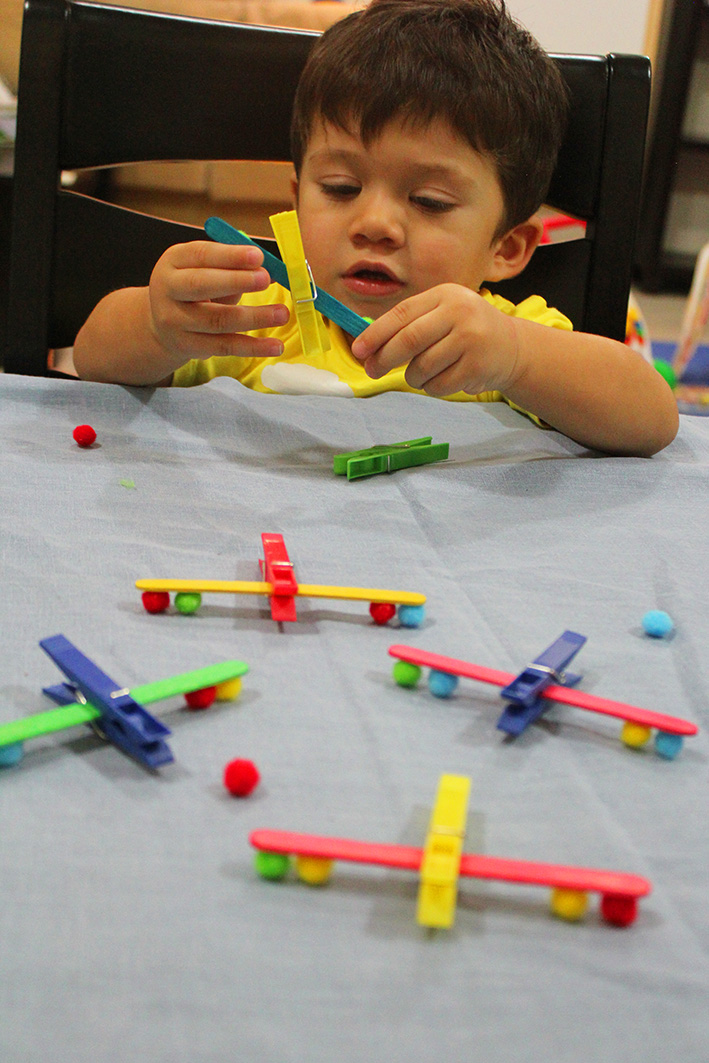
Putting a popsicle stick inside the clothespin might seem easy, but for small hands and tiny muscles it needs fine motricity to pinch the clothespin. With a little help from mommy, here are the wings!

clothespin airplanes

clothespin airplanes

To make it more realistic, stick pompoms on each side of the pretending wings. Sticking is an interesting activity to nady. We kept on sticking and removing the pompoms for a while.

clothespin airplanes

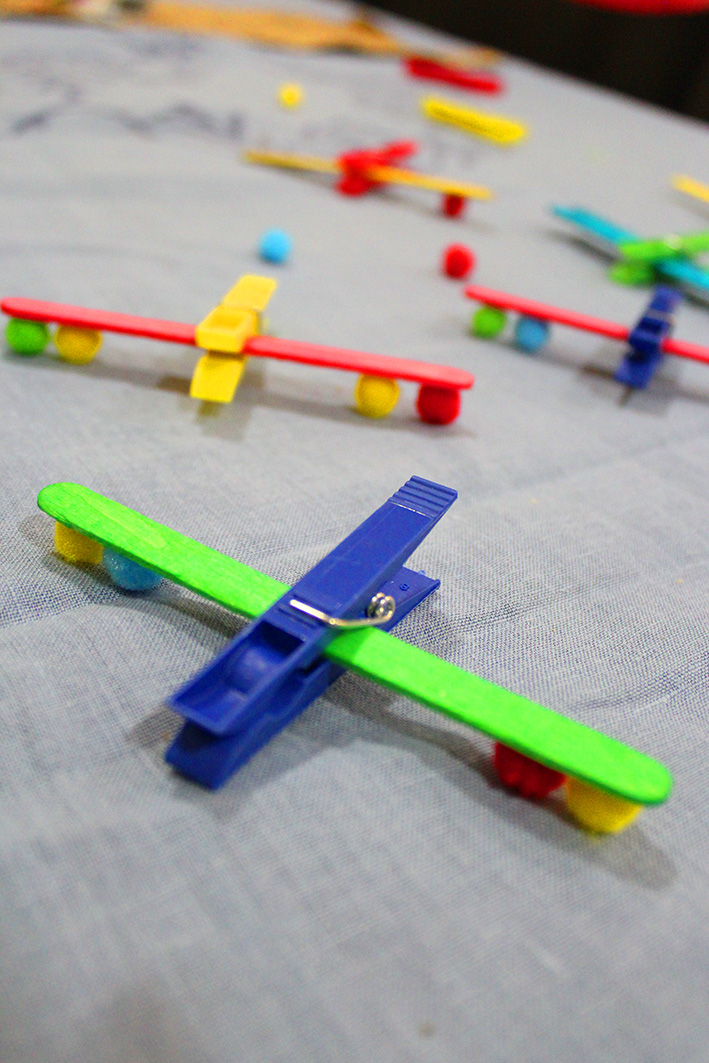
Here are our lovely colorful planes!

clothespin airplanes

clothespin airplanes

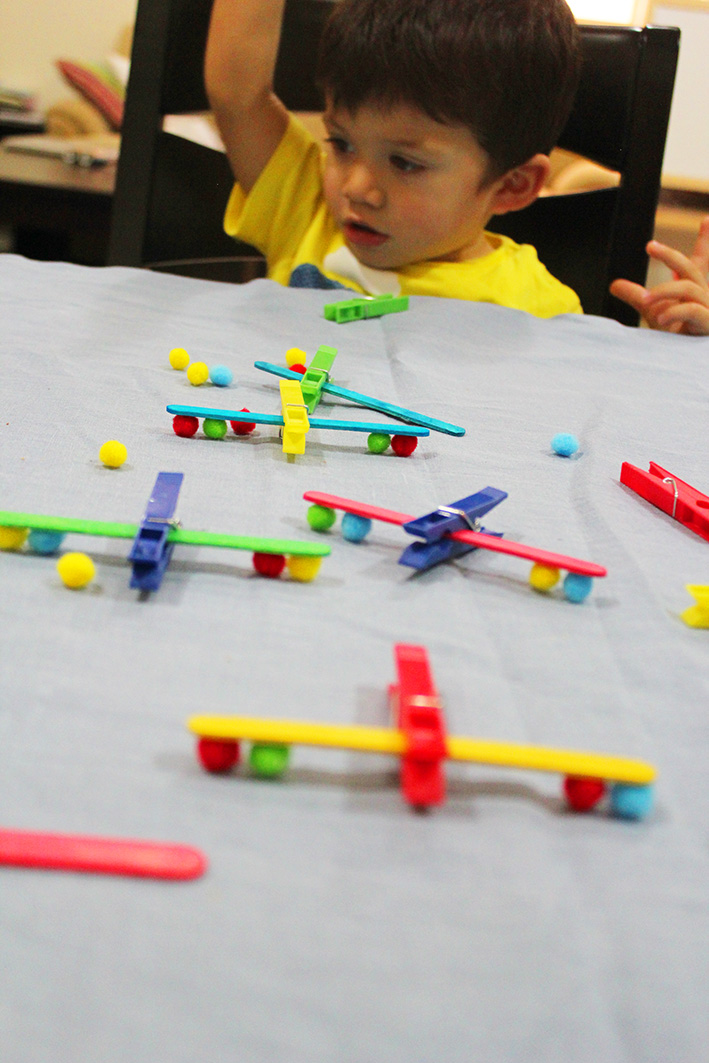
Actually Nady enjoyed crafting the planes, but he didn’t want to pretend traveling in them. He was pointing at the sky for real planes. Well i don’t blame him 🙂


DIY cheese board – Spruce up your kitchen


DIY - cheese board

Being in a crafty mood nowadays, i am going through my kitchen, trying to throw recycle, create and posh it up. With a simple touch you can add some excitement to your items. You know by now, i am fond of personalized items, i love to give identity to everything in my house, and even to the gifts i offer.

After the sharpie plates DIY , today’s craft is very simple and could be done in couple of hours. it’s often the simplest ideas that are the most striking. Adding some colors and typography to my cheese board, made all the difference!

With non toxic red acrylic , I painted the edge of the cutting board after i wrapped it with a thread to create lines effect. Diluting the acrylic with more water creates a “wash” of paint, and shows the wood grain beneath.

DIY - cheese board

After a lot of reading to see which paint to use for food safe purpose, Acrylic paint was the best. It is a water soluble paint but become water-resistant when dry. It is a fast drying and durable paint, containing pigments suspended in an acrylic (or plastic) binder.  They come in a wide range of vibrant colors, easy to apply and clean up and have no fumes. BUT Not all acrylic paints are non-toxic or food safe. Please read paint labels and look for the “AP Non-toxic” seal. Do NOT use paints without this seal. Some have mercury, arsenic and cadmium in them for pigments and you absolutely do not want these ingredients.

After a couple of hours, the paint is dry. I traced the word “cheese” and filled it with dark brown acrylic color.

DIY - cheese board

And here is my new adorable cheese board!

DIY - cheese board

With a little creativity and a couple of hours, you can personalize your things at home and be unique. I am planning to use it for the first time in a romantic cheese and wine with my hubby! Time flies, enjoy every second of it.

DIY - cheese board


Customize your plates with baked sharpie – DIY


sharpie plates

Baked sharpie are permanent! yes they are. I couldn’t believe it until i tried myself.

Write with a sharpie (permanent marker) on a plate that’s oven safe, bake for 30 mns (180°C) and that’s it! Your design is permanent and safe!

sharpie plates

This is how my plates looked before going in the oven.

sharpie plates

In the design stage and before baking, if you made a mistake while writing or you wish to clean off sharpie, just use rubbing alcohol and it’s gone!

After 30 mns baking,  I turned off the oven and kept them to cool. Then I washed them to use. The writing didn’t go off and this is how it looked! Beautiful result.

sharpie plate

Being crazy about personalized items, now i found the way to do it, expect me writing and drawing on all my dinner ware and creating gifts for family and friends with this fun new technique.

baked sharpie

So simple and affordable. Design a unique mug for your husband, or plates for your children… Let this DIY be a token of affection to your loved ones.

sharpie plates

Love my plates! expect to see them more often in the pictures!


If you have 5 minutes lets DIY! Irresistible goat cheese appetizer


goat cheese & rosemary

With less than five minutes, you can make this beautiful appetizer from scratch.

All you need is spring roll pastry and cupcake mold to make the base shell. Very simple technique:

shell crust

Cut square shapes. Place them in the cupcake mold and adjust the edges in a way to have like a cup. Leave a space between each one so they don’t touch. Bake them on 180°C for 3-4 minutes or until golden brown.

appetizer shell

crust shell

As you see it’s like a cup, you can fill it with any food of your choice. For instance, i used goat cheese (my favorite) and rosemary. Et Voila it is ready to serve.

goat cheese & rosemary

Wouldn’t you just love to have one of these beautiful appetizer? Small tips turn a simple food to a decorative one, giving you pleasure to the eyes and butterflies in your stomach.

Happiness is in details! If you want to see more of interesting things,  follow this blog and like marmite et ponpon facebook page. Happy day to all of you!

How to jazz up your drink with floral ice cubes – DIY-


floral ice cubes

Freezing edible flowers in ice cubes liven up your drink. It’s a cool way to celebrate the flowers charm. If you have a special guests or you just want to spoil your family and friends, it is a must do. You will wow them for sure, and they will talk about this festive presentation for sometime!

floral ice cubes

Very simple to do, taking into consideration some small tips;

  • for clear ice, use distilled water that has been boiled and then cooled. This avoids impurities and air bubbles, which make ice cloudy.

floral ice cubes

floral ice cubes

  • make sure to use edible flowers such as: rose, lavender, lilac, violet, tulip, orchid, pansy, jasmine, orange blossom, lemon blossom, marigold, chrysanthemum, hibiscus, chamomile, gardenia, sunflower, thyme, rosemary, mint, marjoram, hibiscus, fennel, dill, coriander, chives, chicory, basil and sage.

floral ice cubes

  • if you don’t want the flowers to float to the top of the water, fill the water half way up, add the flowers, freeze, then cover the flowers with more water and freeze again. This will ensure they are completely within the ice cube. But i still like the flowers poking out from the cube!

floral ice cubes

floral ice cubes

  • Use an ice tray that makes large cubes so the ice will last longer and the flowers are more visible.

Even a simple glass of water would look cheerful with these attractive ice cubes! Beat the heat with fun and simple ideas (especially Doha heat, almost 45°C now with high humidity).

floral ice cubes

People used to dry meaningful flowers to save them, now you can freeze them to be used in drinks. By the way these are the flowers from our wedding anniversary bouquet!

Join me to the fun and see more of interesting things. Follow this blog and like marmite et ponpon facebook page. Happy day to all of you!