Fun straw painting


fun straw art| marmite et ponpon

Blow the paint with a straw to make spiky hair! Super fun art, doesn’t require brush skills but a straw and lots of enjoyment. It’s an activity that involves humor, your kids will love blowing spiky hair on their own head (image).

All you need is watercolors, straw and a picture of your kid’s face. Drop small amounts of watered paint and let your kid enjoy blowing it into different directions.

fun straw art |marmite et ponpon

fun straw art | marmite et ponpon

straw art |Marmite et ponpon

The more they blow the longer the line is. Turn the paper in all directions so the hair looks crazy. Use all the colors you have for a beautiful outcome.

straw art | Marmite et ponpon

fun straw art|marmite et ponpon

straw art|Marmite et ponpon

There is no time or end for this activity, the more they blow colors the bigger the hair is. Leave them the freedom to choose when to stop. It was really a fun play, there was lots of laughs and giggles. Nady really enjoyed it and loved how his hair looked at the end.

straw art |Marmiteetponpon

straw art | Marmiteetponpon

If you like this post give it many likes and shares to spread the joy. Don’t forget to like marmite et ponpon facebook page and follow on twitter. More interesting posts are yet to come.


Artful bread


artful bread |marmite et ponpon

Edible art sounds really fun. When i told Nady that we are going to paint the bread he was really excited, i knew that my plans will work. Beside fun, the aim of this activity was to encourage Nady to have his dinner. And it worked 🙂

This edible paint is easy to make. All you need is milk and food coloring. Hand the clean brush (preferably new) to your kid with white bread slices and let him prepare his sandwich.

With this process art activity, the end result was fun too. Do you find difficulty to let your kid eat his sandwich? Try this creative and fun art activity, at least it worked for us, we added cheese and zatar and we all had dinner from Nady’s bread design.

If you like this post give it many likes and shares to spread the joy. Don’t forget to like marmite et ponpon facebook page and follow on twitter. More interesting posts are yet to come.

Snaynyé – celebrating the first tooth out


snaynye-celebrating the first tooth|marmite et ponpon

Snaynyé, lebanese tradition to celebrate the baby’s first tooth out.  The word Snaynyé comes from “snen” that means teeth. The mother prepares this traditional sweet once the first tooth appears and she sends to family, neighbors and friends who will return the empty plate with a gift to wish mabrook the new tooth.

snaynye- celebrating the first tooth|marmite et ponpon

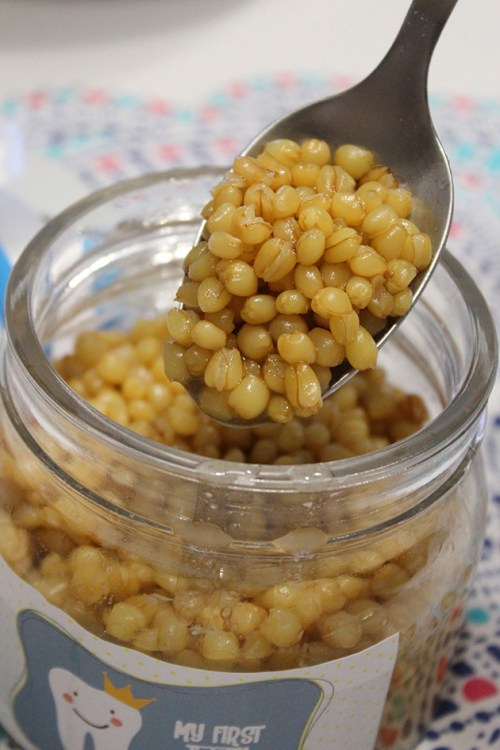
Snaynyé consists of boiled wheat garnished with sugar, orange blossom and nuts. Previously they used to put colored sugar coated chickpeas and pomegranate seeds, but nowadays with the endless variety of sweets they decorate it with jelly beans, marshmallows, M&M….

Very easy and simple to make. You choose how much wheat you want to make, you soak it in water at least 12 hours and then you boil it until tender. For a nicer hint of anise taste, you put anise seeds when boiling. When serving you add sugar and orange blossom water to each portion according to the person taste. It’s served cold and hot also depending on your taste. personally i like it hot.

For garnish you can put almonds, pine seeds, pistachio, walnut or any nut you favor. Raisins and pomegranate seeds go heavenly with it as well. As for the sweets you can go as creative as you want. The aim is to have candies that need strong teeth to be chewed, to say that our baby now has his first strong tooth. I only put candies (in form of teeth) trying to be as classic as possible.

snaynye-celebrating the first tooth out|marmite et ponpon

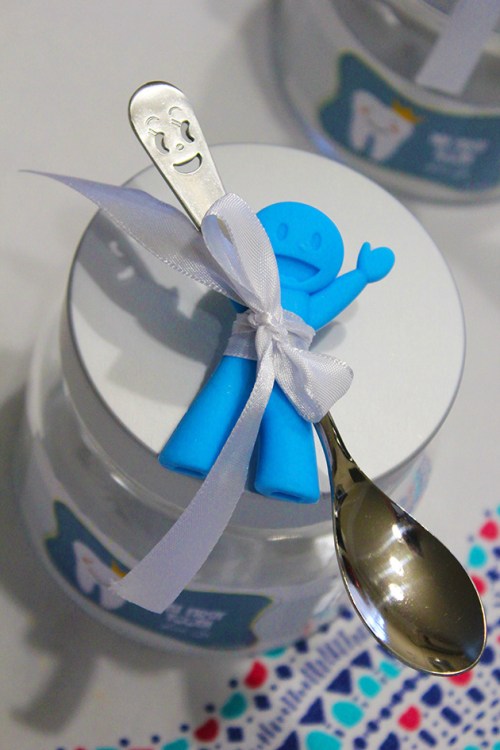
It used to be offered in plates, nowadays people go more creative. I chose to send it to my relatives and friends in jars adding a smiley spoon to remain as souvenir. And as a sushi lover i added to some jars a small boy (smiling and showing his teeth) that serves later as automatic chopsticks for beginner kids to “my sushi lovers friends”. With a “my first tooth” tag to complete the souvenir.

snaynye-celebrating the first tooth out |marmite et ponpon.JPG

snaynyeh-celebrating the first tooth|marmite et ponpon

snaynye- celebrating the first tooth out |marmite et ponpon

I love our traditions and i try to keep them and let my kids live them (though we are living abroad). It’s beautiful how we make from every milestone in our kids life an important and joyful event. God bless all kids and keep them safe, healthy and happy. Mabrook your first tooth my baby love ❤

If you like this post give it many likes and shares to spread the joy. Don’t forget to like marmite et ponpon facebook page and follow on twitter. More interesting posts are yet to come.

Clothpins wall frame – DIY


clothpins wall frame DIY|marmite et ponpon

I am in love with pictures, for me it’s a way to freeze precious moments and recall them whenever i want. Just by looking at a picture, i go back to that moment…

This clothpins frame is an amazing way to decorate your home with as many pictures you want, and in the same time a fun and easy craft to your little one.

All you need is a cardboard and few clothpins.

1- clothpins wall frame DIY|marmite et ponpon2- clothpins wall frame DIY|marmite et ponpon3- clothpins wall frame DIY|marmite et ponpon4- clothpins wall frame DIY|marmite et ponpon

5- clothpins wall frame DIY|marmite et ponpon

I used the cardboard that comes underneath the cake, it’s already cut in round shape, then i cut another circle inside. You choose the size you want, depending on how many pictures to want to display. Nady colored it with gold and silver paint.

When it became completely dry we stuck the clothpins. You can keep them as they are or decorate them with washi tape or simply paint them. Be careful to keep the opening part to the outside to insert the pictures later.

Mount it on your wall to add life to your home!

clothpins wall frame DIY| marmite et ponpon

If you like this post give it many likes and shares to spread the joy. Don’t forget to like marmite et ponpon facebook page and follow on twitter. More interesting posts are yet to come.

Plastic bottle candle holder – recycling crafts


plastic bottle candle holder recycling craft| marmite et ponpon

Sometimes these fun recycling projects are so interesting for adults as much as for kids. For instance, these flower candle holders made from empty plastic bottles were fun to make for both of me and nady. They made a beautiful decoration element in the house.

plastic bottle candle holder recycling craft |marmite et ponpon

All you need are:

  • empty plastic bottles
  • scissors
  • lighter
  • acrylic paints
  • candles

plastic bottle candle holder recycling crafts | marmite et ponpon

How to do?!

Start by cutting the top part of the bottle with a scissor. Cut five to six parts (making the petals) than trim each part to look like a flower petal. Pass the edges over a lighter flame, to burn and torn them to look like a real petal. Then give it to your kid to color it. After it’s completely dry insert a candle.

1-plastic bottle candle holder recycling craft|marmite et ponpon2-plastic bottle candle holder recycling craft|marmite et ponpon3-plastic bottle candle holder recycling craft|marmite et ponpon4-plastic bottle candle holder recycling craft|marmite et ponpon5- plastic bottle candle holder recycling craft|marmite et ponpon6-plastic bottle candle holder recycling craft|marmite et ponpon

plastic bottle candle holder recycling craft | marmite et ponpon

Nady chose blue and green colors, they turned out really amazing. i am in love with these candle holders. I am sure a lot of you wouldn’t believe it’s made from plastic bottles.

plastic bottle candle holder recycling crafts |marmite et ponpon

plastic bottle candle holder recycling crafts|marmite et ponpon

If you like this post give it many likes and shares to spread the joy. Don’t forget to like marmite et ponpon facebook page and follow on twitter. More interesting posts are yet to come.