Tag Archives: lebanon

Activities for your baby from 1-3 months


IMG_6153Most of babies spend the first month feeding and sleeping. At week 5, your baby is awake for longer period during the day, this is prime time to get acquainted with him. There are lot of things to do to support his sensory development and lay strong foundations for learning.

Your baby’s brain expands in size during the first three months, growing about 5 centimeters. HEARING your voice, SEEING your face up close and FEELING your touch are the best learning activities!

IMG_5942

Hearing activities:  After 4 weeks, your baby can tell the difference between familiar voices and other sounds, as he becomes a better listener. Talk to him using a lot of repetition, sing your favorite lullabies, fill the house with music without limiting yourself to children songs. Describe what you see around in the room or even if you have things to do, your baby will still enjoy hearing your voice from across the room.

IMG_5961

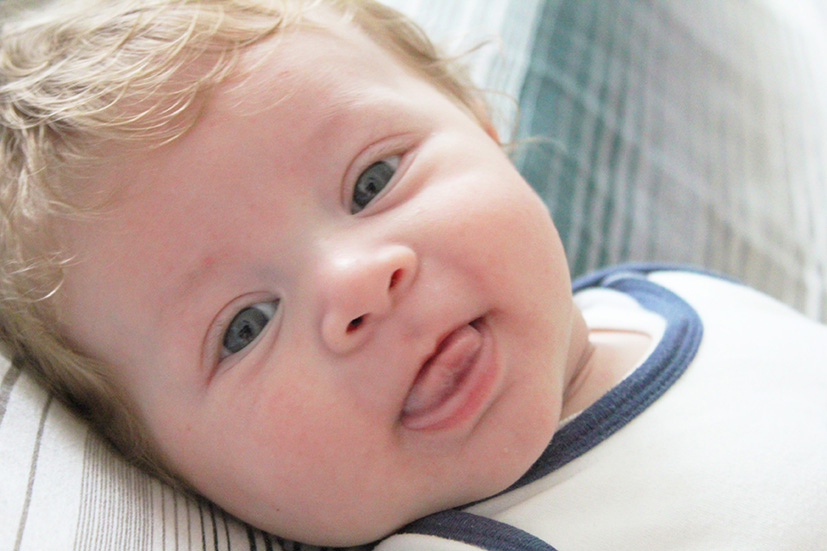
Despite your baby is not able to add to your conversation yet, but you will be amazed how he becomes in tune with his environment, you will notice him looking to see where certain noises are coming from. He tries to communicate with coos, arms and legs movements and a charming toothless smile that will make you forget the sleepless nights and fatigue. Don’t forget to coo back, or copy the sounds he makes, he will like it and carry on the conversation 🙂

IMG_6154

Seeing activities: Your baby loves looking at your face and playing eyes to eyes game. Get really close to him (he sees best up close), do facial expressions, play peek-a-boo type of games, shake a toy (rattle) or move his favorite doudou to see if he follows the movement. Take advantage of the changing diaper time and the bath time to play with your baby,  you will be in a position where he can see your face up close.

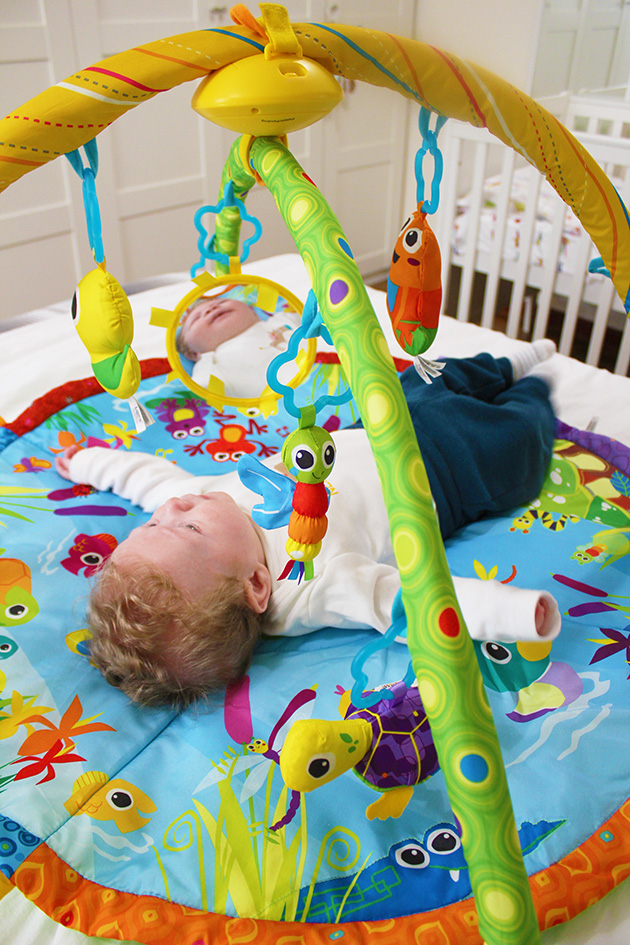
As you know, unlike baby’s hearing (which is fully mature by the end of his first month), the sense of sight develops gradually over 6 to 8 months. At first your baby can’t focus farther than 20-30cm away, just the distance to the person holding him. That’s why you see most babies eyes at birth are wandering randomly or even crossed sometimes. Everything looks blurry in the beginning. At one month he starts focusing and tracking a moving object. At two and three months his brain learns to distinguish colors. As a result, he can now see bright primary colors and more detailed and complicated shapes. Encourage this development by showing him pictures and toys. Now his musical is more entertaining, not just for the sounds but for the hanging toys that he starts now stretching his hands to grab. Try also the mobile projecting light, he will be amazed every time it changes color.

IMG_6191

Touching activities: it’s gym time! Gently move your baby’s arms and legs to exercise. Raise the arms above the head then down, bend the legs up and down or gently massage the joints, using the proper words like open, close, up and down…

IMG_5564

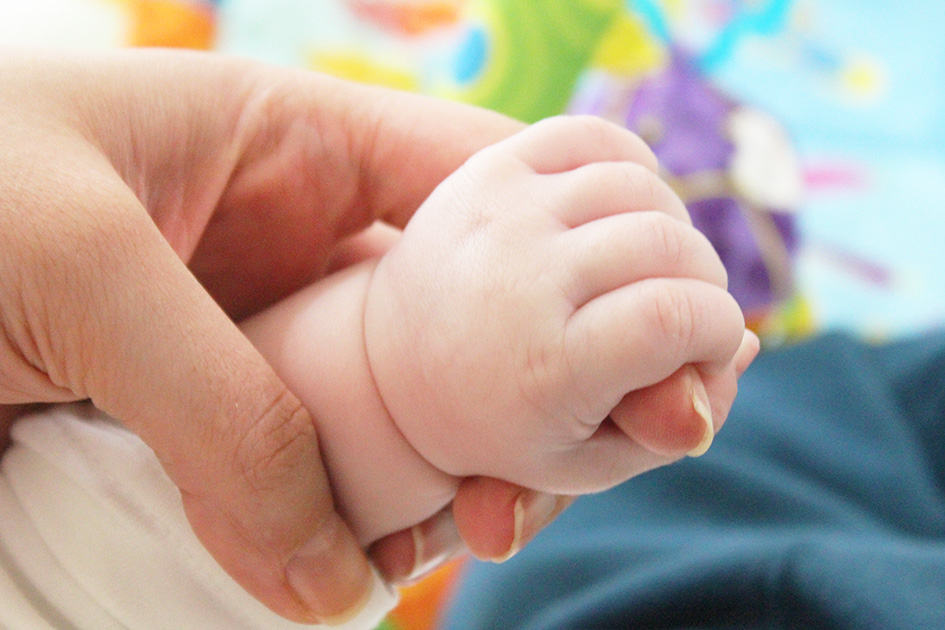
Wiggle your baby’s finger and toes while counting them, clap your hands while he is curling his tiny hands around your finger. Most parents love how their babies curl their hand when they give them their index. Such a beautiful grip that warms the heart!

IMG_6186

Have you ever danced with your 3 months baby?! hold him tight, put a nice music, turn and sway to the beat and enjoy! Make sure you are supporting his neck with one hand.

Give your baby a space to stretch and move his arms and legs. These movements can help your baby strengthen and tone his developing muscles.

IMG_6182

Tummy time is essential from day one to help your baby grow strong. Experts find that babies who don’t spend time face-down often have some delays in their development of motor skills. On his tummy, he’ll start to push off with his legs, this is the first step in getting ready to crawl. Make sure your baby isn’t hungry or tired for the tummy time and don’t place him on a full belly to avoid spit up and acid reflux. The best time is after an hour from feeding.

Some mothers do these activities naturally, following their instinct, i believe our grand mothers and great grand mothers didn’t have access to internet or didn’t attend coaching classes and it’s amazing how they raised healthy and happy babies. Always trust your motherhood instinct and follow your heart. You are a great mother by nature 🙂

IMG_6151If you like this post give it some likes and shares to spread the joy. Don’t forget to like marmite et ponpon facebook page and follow on twitter. More interesting posts are yet to come.


5 minutes banana chocolate chip cake, great for school


Banana chocolate chip cakeOver ripe bananas means it’s time for a banana cake. This recipe is extremely easy and quick. If you’re not fan of cooking or baking, this fool proof cake will make you a star in the kitchen. It takes time to prepare less than the time you need to preheat the oven. 5 MINUTES!!!! yes, try it!

  • 3 slightly over ripe bananas
  • 1 egg
  • 1/2 cup vegetable oil
  • 1 tsp vanilla
  • 1 cup brown sugar
  • 1 tsp baking soda
  • 1/2 tsp baking powder
  • 1/2 tsp salt
  • 1 1/2 cup all purpose flour
  • 3/4 cup semi sweet chocolate chip

In a mixing bowl, mash the bananas with a fork, (when really ripe) then mix in oil, egg and vanilla. Add sugar, baking powder, baking soda and salt. Mix all to finally toss in the flour and combine. Finally fold in the chocolate chip. And the batter is ready, in 5 minutes!!

Banana chocolate chip cakeBanana chocolate chip cakeWe poured the batter in small paper molds (it makes 6-7 small cakes) as school friendly portions. I said “we” because my little munchkin is the chef behind this delicious cake. He was preparing his dessert for school.

Bake for 12-15 minutes in a preheated oven ( 200°C). Let it cool and enjoy every flavorful bite.

Banana chocolate chip cakeBanana chocolate chip cake

If you don’t want to bake individual parcels, bare in mind it will take more than 15 minutes to bake one. Start checking after 25 minutes until a wooden skewer comes out clean.

Banana chocolate chip cakeIf you like this post give it some likes and shares to spread the joy. Don’t forget to like marmite et ponpon facebook page and follow on twitter. More interesting posts are yet to come.


Pineapple cake and pineapple flower DIY tutorial


pineapple cakeThe joy of baking a cake for a special occasion shows that simple things in life are the best, a personal touch makes things memorable. Despite the difficulty of having a time on my own with a newborn, i insisted baking Antoun’s birthday cake myself. This is how we are used to celebrate and i won’t change this routine.

A pineapple cake sounds perfect, we all love pineapple at home. To prepare the batter we need:

  • 3 cups flour sifted
  • 1 tbsp baking powder
  • 1/2 tsp salt
  • 1 cup unsalted and softened butter
  • 1 3/4 cup sugar
  • 3 eggs
  • 2 egg yolks
  • 1 cup milk
  • 1/2 cup pineapple juice
  • 2 tsp vanilla extract

Preheat oven to 180°C and prepare 9″ baking dish (greased and floured).

In an electric mixer, whip butter and sugar until fluffy. Mix in the eggs and egg yolks one at a time adding the vanilla with the last egg yolk.

Add the flour and baking powder in small amounts, alternating with the milk and pineapple juice, mixing on low speed until the batter is well combined, scraping down sides and bottom of the bowl after each addition. Bake for 35-45 minutes or until a wooden skewer comes out clean.

pineapple cake

Let it cool for at least one hour. Meantime lets prepare the frosting.

  • 3 cups heavy cream
  • 1 cup powdered sugar
  • 1 cup cream cheese (left at room temperature)
  • 1/2 tsp vanilla extract

In the bowl of the electric mixer, whip the heavy cream until soft peaks form. Add 1/3 of the powdered sugar and whip until stiff peaks form or your cream will be runny when decorating. Scrape into a separate bowl to whip the cream cheese with the remaining 2/3 cup powdered sugar and vanilla. Fold the mixture in the whipping cream.

Now the cake is ready to be decorated. You will need 300g of pineapple chunks (caned) for the stuffing. Divide the cake in two layers, drizzle from the juice of the pineapple can on both layers for a moist texture before putting the cream and pineapple chunks. Cover the whole cake with the remaining cream.

pineapple cakeTo make it look festive and up to the occasion i decorated the top with fresh pineapple, looking like flowers. It’s very easy to make them, follow the fool proof scheme step by step :

pineapple flower DIY

Slice off the top and bottom of the pineapple and peel it. Pop out the seeds on the sides. Slice the pineapple very thinly so that the slices are almost translucent. Lay them on a baking sheet lined with a parchment paper.  Bake at 150°C to dry them out slowly.  Timing will vary, i worked with a baby pineapple so i didn’t need more than 10 minutes before i transfer them to a muffin tin so that the edges curve upward in the shape of a flower. I let them sit to cool  this way to retain the flower shape.

pineapple cakeAdd some of the pineapple stems to give it a realistic look.  Enjoy the heavenly taste of this mouthwatering cake.

pineapple cakeIf you like this post give it some likes and shares to spread the joy. Don’t forget to like marmite et ponpon facebook page and follow on twitter. More interesting posts are yet to come.

Blotto art – foster your kid’s imagination


blotto artA fun art project that always allured kids with its surprise element. What is really fascinating about blotto art is that each time your kids reveal a new painting; No two are ever the same.

To create a blotto painting:

  • fold a white paper in half,
  • open it to put drops of  paint in the center,
  • close it again and rub gently the paper to help spread the paint
  • and finally open it to reveal your surprise blotto art!

blotto artUnfolding the paper was really fun! The look of surprise on Nady’s face was priceless. Each time and before revealing the painting, he was trying to imagine what it looks like. We did so many and it was hard to stop this project, Nady showed full admiration.

blotto artblotto artblotto artIt’s a great fun project to fire your kids imagination. After revealing the final blotto paint, ask your kiddo what he can see and enjoy their creative imagination.

All parents should favor the imagination of their children and feed this power. It’s like revealing the natural genius in them. A child with a good imagination is a happy child. He is more alert and present ability to cope with life’s changes, and more likely to grow into a secure adult.

Imagination ignites the forces of creativity in your children. A creative child, is not necessary growing into an artist adult. Creative people see things in different ways and find solutions to problems others might miss. Problem solving and innovative thinking begins with the power of imagination. Leaders are creative people!Back to our blotto project, to extend the fun we decided to add objects to the paintings after giving them identity. We enjoyed sticking wiggling eyes, feathers, pompoms…

blotto artblotto artLeave the freedom of imagination to your kids, don’t force a yellow spot to be the sun, sit back and watch him spark his brain to forge imagination pathways of its own.

The first few years are really important for your children mental development, expose your toddlers to new experiences especially the pretend play to help them grow up as problem solvers.

blotto artIf you like this post give it some likes and shares to spread the joy. Don’t forget to like marmite et ponpon facebook page and follow on twitter. More interesting posts are yet to come.

Volcanic eruptions and rainbow lava experiment – My Little Scientist


Volcanic eruptions and colorful lava experimentArt and science come together in this fun and colorful experiment. This activity comes together with just 3 ingredients and no preparation;  In a brown cup (close to look like a real volcano) we put roughly 1 cup of baking soda with few drops of food coloring, then we poured the vinegar, enough to start seeing the eruptions (due to acid – base reaction).

Volcanic eruptions and rainbow lava experimentTo get those colorful ripples, looking like a rainbow, we were adding the food coloring one after the other while the volcano was erupting.

Volcanic eruptions and rainbow lava experimentWe started with green, yellow and blue, first all together then one at a time to get like earth colors ripples, and ended it with the red orange to look like a real volcano!.Every time we were adding a color, Nady was pouring more vinegar to get more and more eruptions. We did many until there was no more vinegar left at home 🙂

Volcanic eruptions and rainbow lava experimentVolcanic eruptions and rainbow lava experimentStunning right? Nady and I were in awe!! Don’t hesitate to try this experiment, it’s absolutely safe (The chemicals produced are non-toxic), easy and so much fun.

Volcanic eruptions and rainbow lava experimentVolcanic eruptions and rainbow lava experimentIf you like this post give it some likes and shares to spread the joy. Don’t forget to like marmite et ponpon facebook page and follow on twitter. More interesting posts are yet to come.